Since we’re on the subject of blood-sucking pests, we might as well cover the other creature that you’re likely to encounter if your indoor/outdoor cat named Whiskers starts to have some unexpected hygiene problems. This will be the first installment of a three-part series about fleas. Fleas are tricky in a way that many other pests are not, and they often get out of hand with unexpected speed. Because of this, homeowners need to be very involved in the process of eliminating fleas, so we divide our flea treatment plan into three sections: before the treatment, during the treatment, and after the treatment.
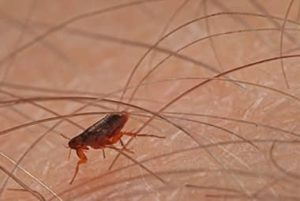
Let’s take a look at that first section today. You’ll probably first notice that you have a flea problem because you might see little blackish specks jumping around on your furniture or on the carpet. Even adult fleas are tiny compared to many pests (this helps them move quickly within a forest of pet hairs), and it may take time to realize that they are around in numbers. Once you’ve confirmed that you have a flea problem it’s best to act quickly before they have a chance to get settled into a breeding cycle.
Once you’ve called to set up a flea treatment, you should begin a cleaning frenzy. Just before the appointment, get everything off the floors that you don’t want treated. This includes your children’s toys, the shoes in the bottom of your closet, and the stack of books by the desk. In many cases, the technician will be treating large portions of the floor and sometimes the furniture as well if Whiskers is a couch potato and has set up a flea colony there. You need to be sure that anything you don’t want treated is well out of the way so that the technician can do his or her job efficiently and effectively.
After all the small items are off the floor, get Whiskers out of the house and put all pet bedding in the washing machine. You may not know this, but your regular house dryer is strong enough to kill many pest eggs (including bed bugs), so a thorough run through the washer and dryer will do wonders for any flea problems in the pet bedding.
While the laundry is running, grab the vacuum and sweep all of the carpet in the entire house, including bedroom and linen closets and any upholstery furniture that Whiskers has been on. Now, here’s the important part. You must remove the vacuum bag from the house or empty the canister in an outside trashcan when you’re done sweeping. Getting sucked up into the vacuum does not kill most pests, and if you just put the vacuum back into the closet without emptying it, the fleas will walk right back out and re-infest the house. The vacuuming should be completed very shortly before the technician arrives (for reasons that we’ll discuss in the next post).
The prep work is almost done! Your remaining tasks include making sure that the lawn is mowed as short as possible since fleas hide in tall grass and the technician will treat around the outside of the house to keep fleas from setting up shop in the grass by the walls. Shut off the fish tank, and have a plan ready so that you, your family, and all of your pets (except the fish) can be out of the house for about four hours after the treatment.
Congratulations, you have finished the preparation for your flea treatment. Go reward yourself with a smoothie while the technician gets down to business at the house. In our next post, we’ll discuss the technician’s treatments along with some flea biology. Later, we’ll cover how you should follow-up after a flea treatment to be sure you don’t end up having another invasion from the same family of fleas.